 Flyby is a satellite tracking application that runs in a terminal (no GUI required). I wanted to run it on my Raspberry Pi that has a display attached to it so I can carry it outside with me when tracking amateur satellites. This is much easier to move around than a laptop or even my phone where I have to keep the screen from going to sleep or touching something on the screen.Setting up Flyby on a Raspberry Pi was a bit of a challenge but it is now working fine. Here’s my setup steps:
Install Raspbian
I am using Adafruit’s 3.5” TFT display so I used their custom image with the drivers already configured. You can find that here: https://learn.adafruit.com/adafruit-pitft-3-dot-5-touch-screen-for-raspberry-pi/easy-install.
Install Dependencies
Once you have Raspbian setup, you will need to get the device networked and install some dependencies of flyby:
# apt-get install libncurses-dev cmake gcc make git
Get latest Flyby and libpredict source code
Check out the source code for both projects using git:
# git clone https://github.com/la1k/libpredict.git
# git clone https://github.com/la1k/flyby.git
At the time of writing this, I ran into a few issues with crashes while starting up flyby. A patch has been filed here: https://github.com/la1k/flyby/pull/74
Patch
If you run into problems when trying to do the initial QTH setup (that’s later on in this post), then my fix may not have been merged yet. You can checkout the patch using, rebuild, and re-try:
# cd flyby
# git fetch origin pull/74/head:qth-setup-segfault
# git checkout qth-setup-segfault
Update: patch above has been accepted.
Build
After you have checked out the sources, run the build process for libpredict:
# cd ~/libpredict
# mkdir build; cd build
# cmake ..
# make
# sudo make install
# sudo ldconfig
Then, build flyby:
# cd ~/flyby
# mkdir build; cd build
# cmake ..
# make
# sudo make install
A few final tweaks before running
The default font in Raspbian is too big to render flyby properly. Change the terminal by doing this:
# sudo dpkg-reconfigure console-setup
Choose the following options in each prompt:
- UTF-8
- “Guess optimal character set”
- Terminus
- 6x12 (framebuffer only)
The screen may hang for a moment while the settings are applied. After it completes, you will be sent back to a shell with your new font visible.
Run it!
Finally, start up flyby simply by executing:
# flyby
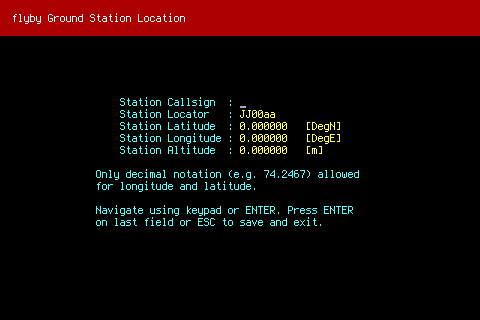
Your screen should look something like below. Fill in your details and you are good to go :)
Remeber, if you are not able to save your settings above and experience a Segmentation Fault, then follow the steps in the Patch section earlier in this post.Finally, proceed with the normal setup steps provided in flyby’s Wiki: https://github.com/la1k/flyby/blob/master/docs/usage_guide.md#obtaining-and-updating-tlesUpdate (again): patch above has been accepted.